The Peaks and Valleys of Mars
If you have encountered 3D interactive Mars websites such as Mars in Google Earth or NASA Mars Trek you probably stood in awe at how much work went into them.
Yet with the help Melown Tech’s VTS 3D Geospatial Software Stack and using only publicly available data sources, you can run a similar website in a couple of hours. And if you put some extra thought and work into it, your site might even be superior to its aforementioned respectable counterparts in some respects! This tutorial will walk you through the process.
Preparation
As a prerequisite, you need to have your VTS backend environment set up. You can follow our earlier tutorial to do so.
You will need at least 10GiBs of free disk space.
Some of the steps you will perform are quite CPU intensive. A quad core node / droplet is recommended. A dual core is fine, but get yourself some coffee and biscuits.
Make sure you use the vts system user for data manipulation commands in the rest of this tutorial:
$ sudo -iu vts
As a good practice, create a resource directory and dataset subdirectory to configure and store our Mars-related resources
$ sudo -iu vts
$ mkdir -p /etc/vts/mapproxy/mars-case-study.d
$ mkdir -p ~/mapproxy/datasets/mars-case-study
and extend your mapproxy resource configuration to include these resources. The third line in the following mapproxy resource configuration file (`/etc/vts/mapproxy/resources.json`) does the trick:
[
    { "include": "examples.d/*.json" }
    ,{ "include": "mars-case-study.d/*.json" }
]
The Global Mosaic
For a global model of any celestial body, you need a global mosaic. We choose the 232m/px Mars Viking MDIM21 Color Mosaic available from USGS Astrogeology Science Center.
The original file is almost 12GiBs and takes quite a while to download. You might prefer to obtain a deflated 5GiB version from our servers:
$ cd ~/mapproxy/datasets/mars-case-study
$ wget https://cdn.melown.com/pub/vts-tutorials/mars-peaks-and-valleys/Mars_Viking_MDIM21_ClrMosaic_global_232m.tif
Alas, there are no overviews in this dataset. For large files, overviews are needed for VTS backend to handle them efficently. Use generatevrtwo utility to create a tiled virtual dataset with overviews. Depending on your CPU resources, overview generation may take some time:
$ generatevrtwo --input Mars_Viking_MDIM21_ClrMosaic_global_232m.tif --output Mars_Viking_MDIM21_ClrMosaic_global_232m.average --resampling average --wrapx 0 --co PREDICTOR=2 --co ZLEVEL=9 --tileSize 4096x4096
The --wrapx parameter above indicates that the image is cyclical and that it has no overlapping pixels. It is important to obtain a seamless result in overviews.
The virtual dataset created is in fact in <generatewrtwo-output-dir>/dataset. Creating a symbolic link to access it is practical:
$ ln -s Mars_Viking_MDIM21_ClrMosaic_global_232m.average/dataset mars-viking-mdim21
Take some measurements from the dataset using the mapproxy-calipers utility:
$ mapproxy-calipers mars-viking-mdim21 --referenceFrame mars-qsc
2017-07-13 14:57:43 I3 [17237(main)]: [mapproxy-calipers] Config:
    dataset = "/var/vts/mapproxy/datasets/mars-case-study/mars-viking-mdim21"
    referenceFrame = mars-qsc
... some low level errors you may safely ignore ...
range<qsc-right-dmars2000>: 2,9 9/256,128:383,255
range<qsc-back-dmars2000>: 2,9 9/384,128:511,255
range<qsc-left-dmars2000>: 2,9 9/0,128:127,255
range<qsc-front-dmars2000>: 2,9 9/128,128:255,255
range<qsc-top-dmars2000>: 2,9 9/128,0:255,127
range<qsc-bottom-dmars2000>: 2,9 9/128,256:255,383
range: 2,9 0,0:3,2
position: obj,0.007055,0.000000,float,0.000000,0.000000,-90.000000,0.000000,6792334.739508,55.000000
The important part of the information above is the tile and lod range, on the second line from bottom. You will use it in the next step.
And finally, configure the mapproxy resource. Create a resource configuration file at /etc/vts/mapproxy/mars-case-study.d/mars-viking-mdim21.json with the following contents:
[{
    "group" : "mars-case-study",
    "id" : "mars-viking-mdim21",
    "comment" : "Mars Viking MDIM21 Mosaic",
    "type" : "tms",
    "driver" : "tms-raster",
    "definition" :  {
        "dataset" : "mars-case-study/mars-viking-mdim21",
        "format" : "jpg",
        "transparent" : false
    },
    "referenceFrames" : {
        "mars-qsc" : {
            "lodRange" : [ 2, 9 ],
            "tileRange" : [
                [ 0, 0 ],
                [ 3, 2 ]
            ]
        }
    },
    "registry" : {
        "credits" : {
            "nasa-ames" : {
                "id" : 201,
                 "notice" : "NASA Ames"
            }
        }
    },
    "credits" : [ "nasa-ames" ]
}]
This resource configuration file creates a VTS mapproxy tiled map service resource based on the dataset provided. Among other things, it tells VTS mapproxy that the resource shall be known under “mars-case-study-mars-viking-mdim21” group/id combination and it uses the tile hierarchy defined by mars-qsc reference frame. The lodRange and tileRange are merely a transformation of the following line you’ve seen in the output of mapproxy-calipers above:
range: 2,9 0,0:3,2
VTS Mapproxy will process this configuration automatically within five minutes. If you do not feel like waiting run
$ sudo echo update-resources | socat -T2 - UNIX-CONNECT:/var/run/vts-backend-mapproxy.ctrl
A browsable, multi-resolution tiled color mosaic of Mars should be now available on your system. Point your browser to the following URL to play with it
http://<yourserver>:8070/mapproxy/mars-qsc/tms/mars-case-study/mars-viking-mdim21/
You should something like this:
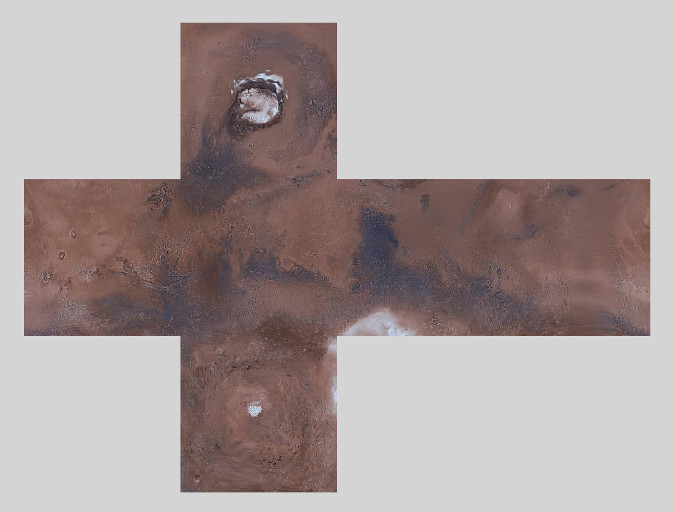
Indeed, mars-qsc reference frame represents Mars as a folded-out cube. Zoom and pan to see some of the details of your new VTS resource.
The Terrain
The 2D map you have just created is fun but you are after something more ambitious: a browsable 3D model of the planet. To achieve this, you need a global DEM. A good choice is 463m/px Mars MGS MOLA Elevation Model, available again from USGS Astrogeology Science Center. Download it as follows:
$ cd ~/mapproxy/datasets/mars-case-study
$ wget https://planetarymaps.usgs.gov/mosaic/Mars_MGS_MOLA_DEM_mosaic_global_463m.tif
Like the global mosaic, this dataset needs overviews to be handled efficiently. And unlike the global mosaic, you will need three different types of datasets created with different filters. Here they come:
$ for resampling in min max cubicspline; do \
    generatevrtwo --input Mars_MGS_MOLA_DEM_mosaic_global_463m.tif \
        --output Mars_MGS_MOLA_DEM_mosaic_global_463m.$resampling \
        --resampling $resampling --wrapx 1; done
The --wrapx 1 parameter indicates that the image is cyclical (as most global datasets for celestial bodies are) and defines the number of overlapping pixels on the sides of the mosaic. You may want to use gdalinfo utility to verify that the first and last columns in this mosaic are indeed identical.
Now, create a directory to hold symbolic links to these datasets:
$ mkdir mars-mola-dem && cd mars-mola-dem
$ ln -s ../Mars_MGS_MOLA_DEM_mosaic_global_463m.cubicspline/dataset dem
$ ln -s ../Mars_MGS_MOLA_DEM_mosaic_global_463m.min/dataset dem.min
$ ln -s ../Mars_MGS_MOLA_DEM_mosaic_global_463m.max/dataset dem.max
$ cd ..
Take some measurements of one of the datasets through mapproxy-calipers:
$ mapproxy-calipers mars-mola-dem/dem --referenceFrame mars-qsc
... some errors you may safely ignore ...
gsd: 460.358
range<qsc-left-dmars2000>: 2,9 9/0,128:127,255
range<qsc-front-dmars2000>: 2,9 9/128,128:255,255
range<qsc-right-dmars2000>: 2,9 9/256,128:383,255
range<qsc-bottom-dmars2000>: 2,10 10/256,512:511,767
range<qsc-top-dmars2000>: 2,10 10/256,0:511,255
range: 2,10 0,0:3,2
position: obj,0.000000,0.000000,float,0.000000,0.000000,-90.000000,0.000000,8830036.910103,45.000000
The second line from the bottom tells you the level-of-detail range (from 2 to 10) and the tile range at coarsest LoD 2 (column 0 to 3, row 0 to 2). The bottom line gives you as a hint as to what should be used as the initial VTS position for a map based on this resource. We shall make use of this information later.
There is one more step to terrain data preprocessing, resource tiling. VTS mapproxy needs a quick way to determine if a given tile in a multi-resolution hierarchy exists. To create resource tile index, run the mapproxy-tiling utility:
$ mapproxy-tiling --input mars-mola-dem --referenceFrame mars-qsc \
    --lodRange 2,10 --tileRange 0,0:3,2
Note that we have made use of the LoD and tile ranges we learned earlier from mapproxy-calipers.
You’re almost done now. Create mapproxy resource configuration file at /etc/vts/mapproxy/mars-case-study.d/mars-mola-dem.json with the following contents:
[{
    "group" : "mars-case-study",
    "id" : "mars-mola-dem",
    "comment" : "Mars MGS MOLA Elevation Model",
    "type" : "surface",
    "driver" : "surface-dem",
    "definition" : {
        "dataset" : "mars-case-study/mars-mola-dem",
        "introspection": {
            "tms": {
                "group": "mars-case-study",
                "id": "mars-viking-mdim21"
            },
            "position": ["obj",0.001328,0,"float",0,0,-90,0,8830036.054687,45.000000]
        }
    },
    "referenceFrames" : {
        "mars-qsc" : {
            "lodRange" : [ 2, 10 ],
            "tileRange" : [
                [ 0, 0 ],
                [ 3, 2 ]
            ]
        }
    },
    "registry" : {
        "credits" : {
            "goddard" : {
                "id" : 202,
                "notice" : "Goddard Space Flight Center"
            }
        }
    },
    "credits" : [ "goddard" ]
}]
This resource configuration file creates a VTS mapproxy surface resource based on the DEM dataset provided. Among other things, it tells VTS mapproxy that the resource shall be known under “mars-case-study-mars-mola-dem” group/id combination and it uses the tile hierarchy defined by mars-qsc reference frame. Once again, we have used the LoD and tile ranges we learned earlier from mapproxy-calipers.
An interesting part of the above configuration is the introspection object. VTS mapproxy provides a powerful introspection interface, which allows you to inspect configured resources with dynamically created map configurations. Through the introspection object you give guidelines as to what this configuration should contain (which is a simple alternative to writing a VTS storage view). In this case, you have told VTS mapproxy that the surface should be draped over with the global mosaic we configured before. You have also defined the initial position for the map, based on the infromation you previously gathered from mapproxy-calipers.
VTS Mapproxy will process this configuration automatically within five minutes. If you do not feel like waiting run
sudo /etc/init.d/vts-backend-mapproxy force-update
All right now. Point your browser to
http://<your server>:8070/mapproxy/mars-qsc/surface/mars-case-study/mars-mola-dem/?pos=obj,-77.442856,-7.249034,fix,3502.77,-78.57,-30.97,0.00,261871.59,45.00
On the first try rendering of the map will take quite some time, but eventually, this is what you will see:
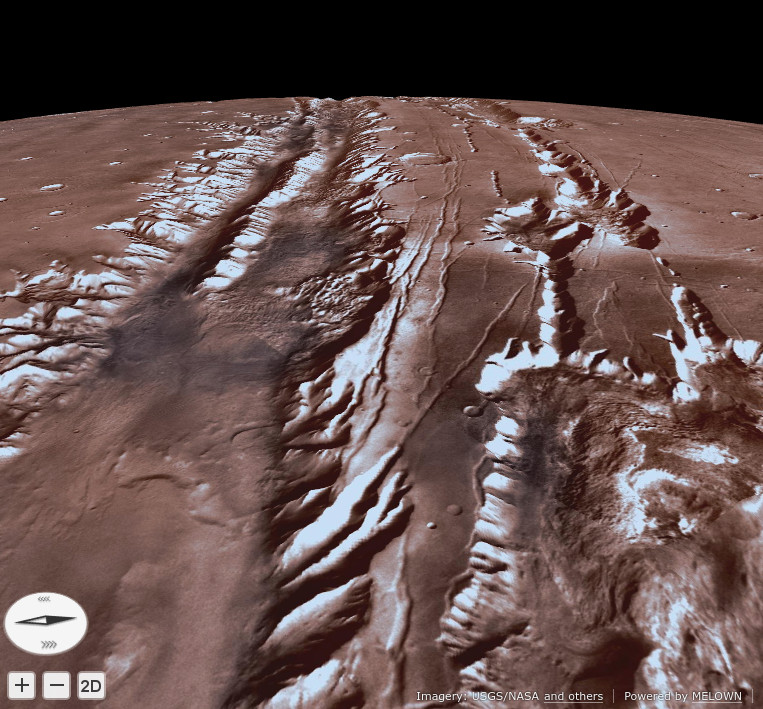
You are looking into the massive equatorial canyons of Ius Chasma which form one of the planet’s most striking topographical features. Zoom in or out, pan, or rotate your view to look around.
That’s it! You are now streaming a browseable, interactive 3D map of Mars from your system. In some of our next tutorials, we’re going to take a look at how to complement this map with even more visual detail and compelling features.